You have a great product. Your quality is solid, your pricing is competitive, and your packaging looks professional. But still, you are not getting a profitable business. Why? Simply because the patience is diminishing, and customers are getting used to on-demand 10-minute deliveries.
Thousands of Indian brands are stuck in the same loop, wondering how to sell on Blinkit and Zepto. This is a case with local FMCG manufacturers or well-established D2C labels. If the situation sounds similar to yours, then you need to tap into that customer base and start selling your products on Zepto and Blinkit.
Why? Because quick commerce marketing services are growing every single day. It recorded a Gross Order Value of 64,000 crore (approx. US$7.6 billion) in FY 2025. The good news? Getting listed is not as complicated as it seems.
So, without any further ado, let's get your products where they belong — in front of millions of consumers to get them delivered in 10 minutes or less.
Get To Know Quick Commerce
Quick commerce product listing is way different from traditional commerce. As the name suggests, it ensures fast delivery, plus introduces brands to an entirely different business model with different economics, customer expectations, and inventory management.
Instead of relying on centralised warehouses, quick commerce uses networks of dark stores — micro-warehouses located in residential neighbourhoods. They are typically 2,000–4,000 square feet in size and stock up to 2,000–3,000 SKUs of the most in-demand products.
In simple terms, these aren't customer-facing retail stores; they're purely fulfillment centers with no showrooms or browsing areas.
How to Sell on Blinkit: A Complete Seller Guide
Blinkit, formerly known as Grofers, is India's leading quick-commerce platform. For sellers, Blinkit is a direct channel to millions of high-intent buyers actively searching for products in groceries, personal care, household essentials, electronics, and more.
For vendors, it includes a structured process that gives you dashboard access immediately. Here is a complete process for each stage with realistic timelines and expectations.
Step 1: Visit the Official Blinkit Seller Portal
For Blinkit seller onboarding, start by visiting the Blinkit Partner Registration page — seller.blinkit.com — and click on "Sell on Blinkit". Enter your email address and verify with an OTP, or sign in using your Google account.
Step 2: Fill in Your Business Details
In the business detail section, enter details about your products and sales. This is divided into two categories: Category & Sales Details and Login & Contact Details.
In the Category & Sales Details section, add the top categories in which you sell your products. Examples include:
- Vegetables & Fruits > Apples & Pears
- Pet Care > Accessories & Other Supplies > Aquarium Accessories
- Atta, Rice & Dal > Toor, Urad & Chana > Arhar
- Home Furnishing & Decor > Home Decor > Aroma & Candles
Thereafter, select your retail channels, social channels, and contact details including SPOC name, designation, and login number.
Step 3: Documentation Submission and Verification
After the initial form submission, you will be presented with a detailed documentation checklist. Blinkit is very particular about documentation format and quality.
NOTE: Incomplete and poor-quality documentation may result in delays and rejections. All documents must be in PDF format, clearly readable, and under 5MB each.
Documents required:
- GST Certificate (GSTIN): Mandatory; must be registered in your name or business name.
- PAN Card: Of the business or proprietor, for tax compliance.
- Business Registration Proof: Certificate of Incorporation, Partnership Deed, or Proprietorship Certificate.
- Bank Account Details: Cancelled cheque and last 3 months' bank statements (current account preferred).
- Trademark Certificate / Brand Authorisation Letter: Required for branded or authorised reseller products.
- FSSAI License: Mandatory for food and grocery categories.
- Company Logo: For brand display on the platform.
- Aadhaar Card: For personal identity verification.
Step 4: Commercial Negotiations
Following document verification, a Category Manager will schedule a detailed discussion about commercial terms. The commission percentage is negotiable based on your brand strength, volume commitments, and product uniqueness.
| Product Category | Typical Commission Range |
|---|---|
| Snacks and Beverages | 12–15% |
| Personal Care and Beauty | 15–18% |
| Electronics (high-value) | 5–8% |
| Groceries and Staples | 10–12% |
| Electronics (accessories) | 12–15% |
Beyond base commission, you'll also discuss promotional budgets, Return to Vendor (RTV) policies, payment terms, launch cities, and rollout plan.
Step 5: Set Up Your Zone (APOB)
Since Blinkit operates in specific delivery zones, your product needs to be stored in warehouses within those zones. If you plan to sell in multiple cities, you must register an Additional Place of Business (APOB) for each state.
NOTE: Each APOB requires a separate GSTIN with a different state code.
Step 6: Product Listing Through NPI Process
Blinkit uses a New Product Introduction (NPI) process managed by your assigned Category Manager. You will receive a product data template (Excel file) to fill and submit. The Category Manager reviews it and provides feedback before publishing.
Step 7: Add Physical Stock to the Network
Once products are listed in the system, you can add physical stock to Blinkit's network. The platform will generate Purchase Orders specifying product quantities, warehouse location, delivery date, and agreed pricing. Blinkit handles all fulfilment — picking, packing, and delivery.
How to Sell on Zepto: The Complete Vendor Guide
Zepto's vendor registration process is similar to Blinkit's but more advantageous for smaller brands or those looking to enter the market faster.
Step 1: Registration and Approval
Go to Zepto's Partner Registration page and click "Register Now". Enter your phone number, OTP, and email address to create an account. Once you submit the application form with preliminary documents, expect a response within 3–5 business days. Upon approval, you get direct access to manage inventory, upload products, track sales, and monitor performance.
Step 2: Documentation and Verification
Documentation requirements are the same as Blinkit. Submission happens through the Seller Hub. Mandatory documents include business registration proof, GSTIN, PAN card, bank account details, and a cancelled cheque. All files must be in PDF format under 5MB. Verification takes 7–10 business days.
Step 3: Direct Product Listing Through Seller Hub
Once verified, you can create product listings directly through the Seller Hub. Details to fill in include product name, category and sub-category, EAN barcode, description, images, price, specifications, shelf life, and minimum supply commitment.
Step 4: Inventory Management and Fulfilment
Zepto generates Purchase Orders based on demand forecasts and your committed supply capability. A major advantage is Zepto's weekly/bi-weekly payment cycle, which helps businesses manage tight working capital.
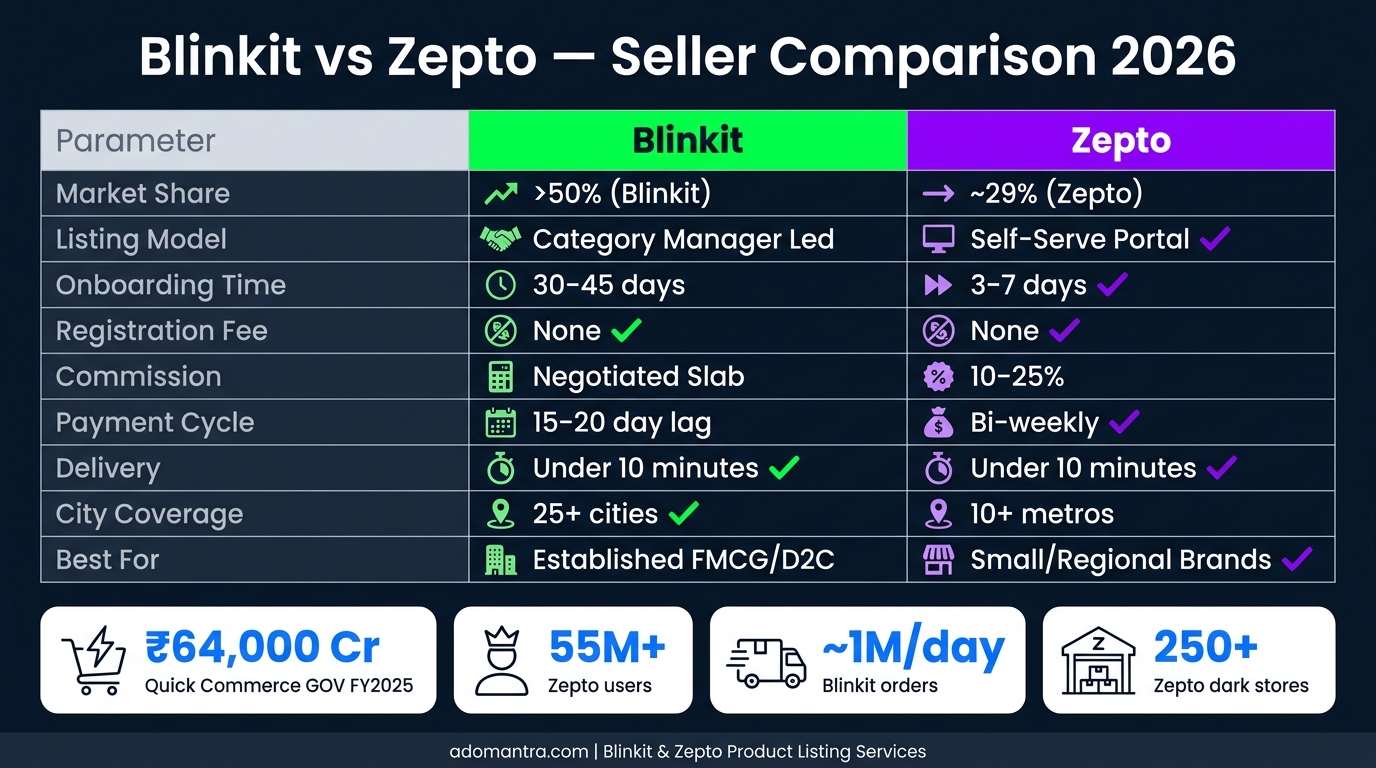
Blinkit vs Zepto: Side-by-Side Comparison for Sellers
| Parameter | Blinkit | Zepto |
|---|---|---|
| Market Share (2025) | >50% | ~29% |
| Listing Model | Category Manager led | Self-serve portal |
| Onboarding Time | 30–45 days | 3–7 business days |
| Registration Fee | None | None |
| Commission | Slab-based % (negotiated) | 10–25% (negotiated with CM) |
| Payment Cycle | 15–20 day lag | Twice monthly |
| Delivery | Under 10 minutes via dark stores | Under 10 minutes via dark stores |
| Cities | 25+ | 10+ metros, 250+ dark stores |
| Key Advantage | Larger reach and higher market share | Strong metro density and curated brand selection |
How Adomantra Can Help
With expertise in Blinkit product listing services and Zepto product listing services, Adomantra simplifies the entire journey for you — from Blinkit seller onboarding and Zepto vendor registration to creating high-converting product listings.
- Complete Blinkit vendor registration and Zepto vendor registration.
- Optimised product listings with SEO-driven titles, images, and descriptions.
- Compliance with platform guidelines to avoid rejection.
- Improved discoverability and conversions through strategic catalogue management.
- Scalable presence with data-backed quick commerce marketing strategies.
Final Words
India's quick commerce marketing services are growing at a faster pace, and the most successful vendors sell on both platforms. With over 55 million users on Zepto and close to a million orders processed every day on Blinkit, there has never been a better time to get your products in front of India's most active online shoppers.
Choose Blinkit as your first platform if you're an established FMCG or D2C brand with an existing market presence. Choose Zepto if you're a small or regional brand testing quick commerce viability.
If Zepto and Blinkit product listing services feel overwhelming, find Adomantra by your side — and let us do that with precision.
FAQs
Q1: Can I sell on Blinkit and Zepto without GST registration?
No. Both Blinkit and Zepto verify your GSTIN directly with government portals. GST registration is mandatory.
Q2: Is there any registration fee to sell on Blinkit or Zepto?
No. Neither platform charges an upfront registration or onboarding fee. However, they deduct commissions, fulfilment fees, storage charges, and applicable GST on these charges.
Q3: How long does it take to get listed on Blinkit?
Blinkit's review process typically takes 3–7 business days if your documents are accurate and complete.
Recent Posts
-
How to Get Your Products Listed on Blinkit and Zepto?
-
 How is Adomantra x IRCTC Partnership Revolutionizing High-Volume Digital Media Buying?
-
 Your Product Is on Amazon and Flipkart. So, Why Aren't You Getting Sales?
-
 How Adomantra Helped Brands Capture 234 Crores in Quick Commerce Revenue?
-
 What Are Rich Media Ads and How Can They Boost Engagement?